


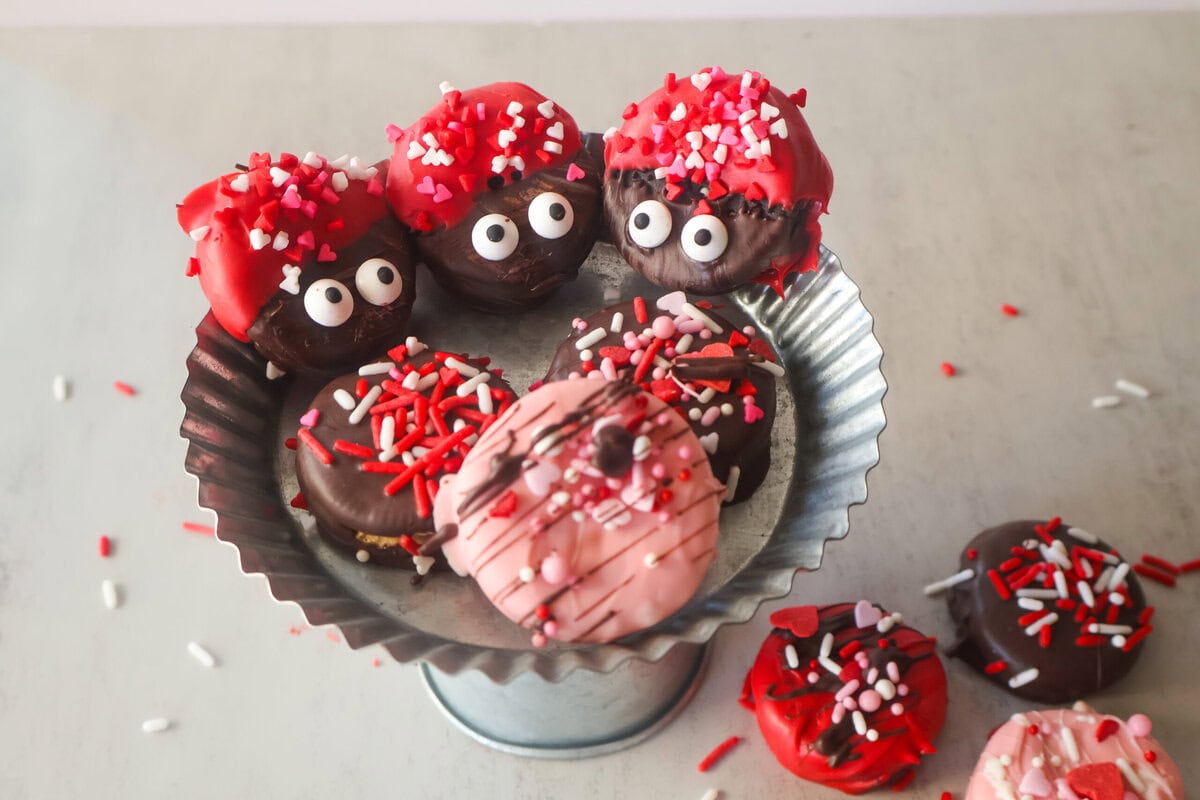
These Valentine’s Day chocolate covered Oreos are an easy, no-bake treat made with rich chocolate and festive decorations. Perfect for gifting, parties, or a quick homemade dessert, they’re simple to make and guaranteed to impress.

💕 Why You’ll Love This Valentine’s Day Chocolate Covered Oreos Recipe:
Perfect for dessert boards and parties – These impressive treats add a beautiful and delicious touch to any Valentine’s spread.
No baking required – This easy recipe comes together fast with simple melting and dipping. They are perfect for busy days.
Bakery-quality results at home – These Oreos look stunning and professional, but they’re incredibly easy to make.
Perfect for gifting – They package beautifully for Valentine’s treat boxes, party favors, or homemade gifts.
Completely customizable – Use milk, dark, or white chocolate and decorate with your favorite festive sprinkles and toppings.
Make-ahead friendly – Prepare them days in advance for stress-free holiday entertaining or gifting.
Ingredients:
Jump to:

⭐ Key Ingredients to Spotlight:
Oreos – The crisp, creamy cookie base that makes this treat easy and delicious.
Chocolate Melting Wafers – Melt smoothly and create a glossy, bakery-style coating.
Valentine’s Sprinkles – Bring festive charm and make each Oreo look extra special.
Candy Melts – Perfect for drizzling and adding a fun, decorative Valentine finish.
See recipe card for quantities.
Instructions:

- Prep your station:
- Line a baking sheet with parchment paper. If using sticks, gently insert one into each Oreo.
- Melt the chocolate:
- Melt wafers in 30-second intervals, stirring until silky smooth.

5. Dip like a pro:
Dip each Oreo fully into chocolate, tap gently to remove excess, and place on parchment.

6. Add the magic:
While chocolate is wet, sprinkle with crushed freeze-dried fruit and Valentine sprinkles.

7. Drizzle & decorate:
Melt pink or red candy melts and drizzle over the Oreos for that bakery-style finish.
8. Set and devour:
Let set at room temperature or chill for 10–15 minutes until firm.

Substitutions & Variations:
Use different Oreos:
Swap classic Oreos for Golden Oreos, Double Stuff, chocolate cream, or seasonal flavors for a fun twist.
Choose your favorite chocolate:
Milk, dark, or white chocolate melting wafers all work beautifully. White chocolate is especially perfect for adding Valentine colors.
Add freeze-dried fruit:
Try using freeze-dried strawberries or raspberries for added flavor and crunch. I like to use tru fru because it adds extra flavor and crunch.
Make them extra fancy:
Drizzle with a contrasting chocolate color, add edible glitter, or top with heart-shaped candies for a bakery-style finish.
Turn them into Oreo pops:
Insert lollipop sticks before dipping to create fun, giftable Valentine Oreo pops. Make sure to use double stuff for the Oreo pops!
Helpful Tips & Tricks:
Use melting wafers, not chocolate chips. They set smoother and prettier.
Tap the fork gently on the bowl edge for clean edges.
Store finished Oreos in a cool, dry place.

Make-Ahead & Storage Tips:
Let them fully set before storing:
Even if they feel firm, give the Oreos at least 1 hour to fully set before stacking or storing. This prevents fingerprints, dents, and sticking.
Store with parchment between layers:
Place parchment paper between layers to protect the decorations and keep the chocolate coating looking flawless.
Avoid airtight containers immediately if slightly warm:
If stored too soon, condensation can form and cause the chocolate to look dull or sticky. Let them come fully to room temperature first.
Keep them in a cool, dry place, not the refrigerator:
The refrigerator can cause condensation, which affects texture and appearance. A pantry or cool room is ideal.
Make them up to 5–7 days ahead:
Chocolate-covered Oreos stay fresh longer than most desserts, making them perfect for prepping ahead of Valentine’s Day.
Freeze for longer storage:
Place in a freezer-safe container for up to 2 months. Thaw at room temperature while still in the container to prevent condensation.
Humidity is the biggest enemy:
If your kitchen is humid, let them set in an air-conditioned room to keep the chocolate smooth and firm.
Store finished Oreos in gift packaging safely:
If packaging in treat bags or boxes, wait until completely set and cool to prevent sticking to plastic or wrap.

FAQ's:
Can I use chocolate chips instead of melting wafers?
Yes, but melting wafers are recommended because they melt smoother and set with a more professional finish. Chocolate chips can be thicker and harder to work with.
Why is my chocolate thick or hard to dip?
Chocolate can thicken as it cools. Simply reheat gently in short intervals, stirring well. Adding a small amount of coconut oil can also help smooth it out.
How do I get a smooth, clean finish?
Use a fork to dip the Oreos and gently tap off excess chocolate before placing them on parchment paper. This prevents uneven coating and pooling.
Can kids help make this recipe?
Absolutely. Kids love dipping and decorating the Oreos, making this a fun and easy Valentine’s Day activity.
Do the Oreos get soft after dipping?
No, the chocolate coating helps seal in freshness, so the cookies stay crisp for days.
For more recipes like this:


Valentine's Day Chocolate Covered Oreos
Equipment
- Microwave-safe bowl Essential for melting chocolate safely and evenly.
- Fork or dipping tool A fork works perfectly for dipping and lifting Oreos while allowing excess chocolate to drip off for a smooth finish.
- Parchment Paper: Prevents sticking and makes cleanup easy while helping the chocolate set properly.
- baking sheet Provides a flat surface for the Oreos to rest and set after dipping.
Ingredients
- 24 Oreos (classic or golden)
- 12 oz chocolate melting wafers (milk, dark, or white)
- Valentine sprinkles or heart confetti
- Optional: pink or red candy melts for drizzle
- Optional: lollipop sticks
Instructions
- Line a baking sheet with parchment paper. Insert sticks into Oreos if using.
- Melt chocolate wafers in 30-second intervals, stirring until smooth.
- Dip Oreos fully into chocolate, tapping gently to remove excess.
- Place on parchment and immediately decorate with crushed fruit and sprinkles.
- Drizzle with melted pink or red candy melts if desired.
- Let set at room temperature or refrigerate 10–15 minutes until firm.
Notes
- Use melting wafers for the smoothest finish.
- Decorate while chocolate is wet for best adhesion.
- Freeze-dried fruit adds flavor without moisture, keeping chocolate smoot
- If chocolate thickens, stir in ½ teaspoon coconut oil to loosen
- Store finished Oreos in a single layer to protect decorations


